

Integrating Heaters into Outdoor Kitchens for Fuel and Fit
Heat the gathering area, not the cooking path. Integrating heaters into outdoor kitchens works best when warmth is directed toward dining or bar seating while keeping grills, prep counters, refrigerators, and walkways clear. Choose propane or electric based on the space and available utilities, then plan mounting, clearances, and controls around the kitchen’s layout.
A well-placed heater can make outdoor dining more comfortable without heating the entire patio as one zone. The right choice depends on exposure to wind and weather, mounting options, and how the heater fits the overall design.
This guide explains how to position heaters around kitchen and dining areas, compare heater types, and weigh mounted versus freestanding designs. You’ll also learn how to plan for weather exposure and coordinate heaters with pergolas, finishes, and the atmosphere you want outdoors.
Key Takeaways
- Direct warmth toward dining and bar areas, keeping cooking stations and walkways clear.
- Choose fuel around your utilities and use: propane offers flexibility, while electric infrared heaters can warm people and objects directly.
- Compare mounted and freestanding heaters by available space, placement flexibility, and how they fit the kitchen’s layout.
- Account for wind and coastal exposure when choosing a location and planning ongoing care.
- Coordinate heaters with pergolas, clearances, and surrounding finishes so comfort and design work together.
1. Planning heater placement around outdoor-kitchen zones
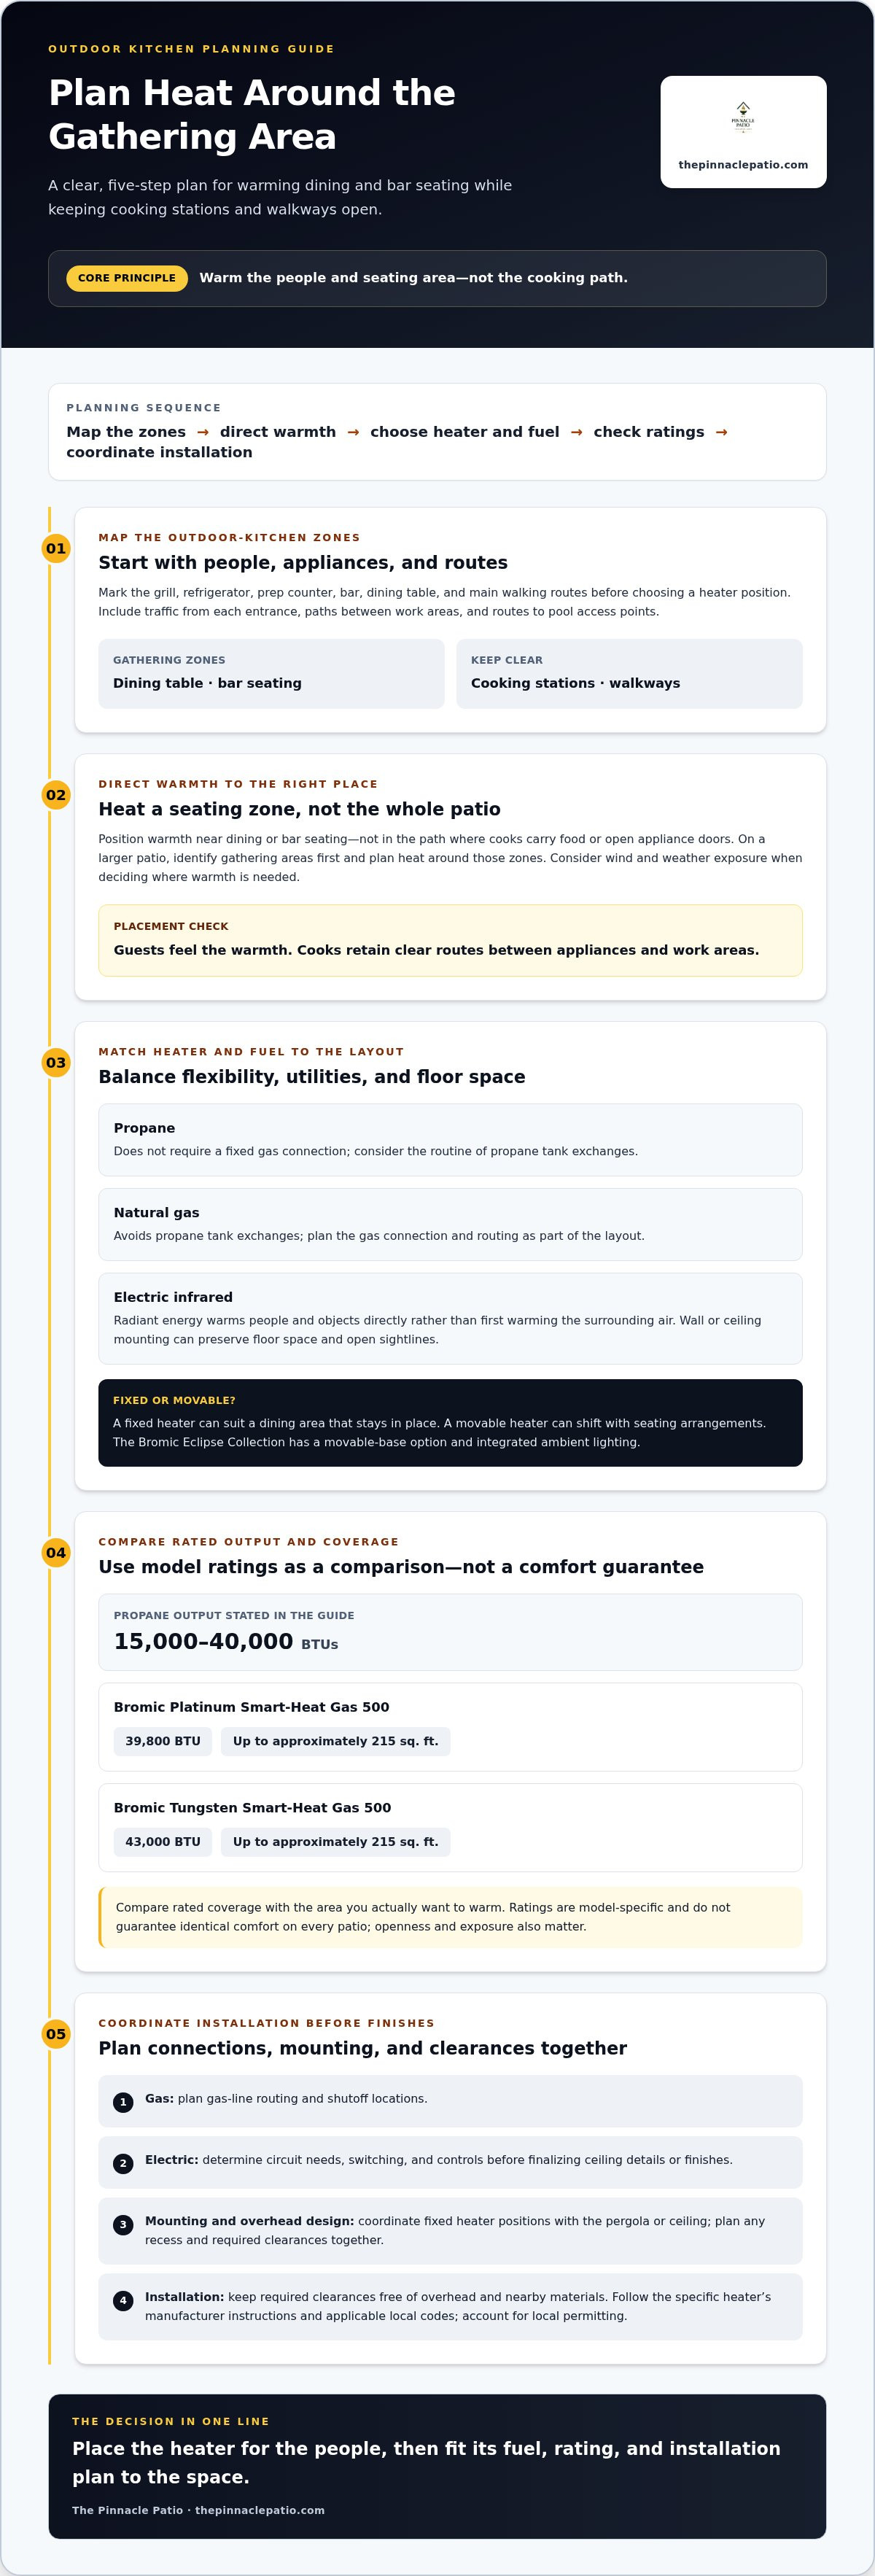
A successful plan for integrating heaters into outdoor kitchens starts with the people, not the appliances. Map the grill, refrigerator, prep counter, bar, dining table, and main walking routes before selecting a heater position. Place warmth near seating or a bar, rather than directly in the cooking path. This directs heat toward guests without adding an obstacle where cooks carry food or open appliance doors.
For a larger patio, identify the gathering areas first and plan heating around those zones rather than treating the entire space as one area. A dining table beyond the grill, for example, may need targeted warmth while the cooking station stays clear for movement. Keep routes to pool access points open, too. Account for traffic from each entrance and between kitchen work areas so the layout works for cooks and guests.
Choose between permanent mounting and a movable heater based on how the space is used. The Bromic Eclipse Collection can sit on a movable base, which allows its position to shift toward a gathering area. It also includes integrated ambient lighting, adding a soft, warm glow alongside heat. That combination can suit a dining zone where overhead fixtures are not part of the architectural plan. For fixed installations, coordinate the heater’s position with the pergola or ceiling design early. The patio heater collection can help you compare options suited to different layouts.
For building codes and permits in the United States, install and use each heater according to its manufacturer’s instructions and applicable local codes. Plan gas-line routing, shutoff locations, appliance clearances, and local permitting as part of the broader kitchen or patio design. For electric heaters, determine circuit needs, switching, and controls before finalizing ceiling details or finishes.
Installation costs depend on the heater and the work required by the layout. Fuel-line routing, electrical connections, mounting, and finish work are key considerations, so plan them alongside the kitchen rather than after construction details are settled. Keep required clearances free of overhead and nearby materials, following the instructions for the specific model.
Treat a fire pit as a separate gathering focal point, not a substitute for targeted heating across a large patio. Keep outdoor fire pits at least 10 to 15 feet from flammable materials such as decks, railings, and structures. Position the fire feature away from kitchen traffic, and keep paper napkins clear of flames. Supervise children around fire tables and keep a fire extinguisher, water source, or sand bucket nearby for emergencies.
2. Propane, electric, and infrared patio heaters
Start by matching the heater to your outdoor kitchen’s utilities and how you use the space. Propane heaters don’t require a fixed gas connection, while natural-gas models avoid propane tank exchanges. Electric and propane heaters can be options for warming an outdoor kitchen without relying on an open flame. Fuel choice affects where a unit can go, how it connects, and what routine use involves.
Propane patio heaters typically deliver 15,000 to 40,000 BTUs, but output alone doesn’t determine comfort. Consider the heated zone, exposure, and whether warmth should reach diners or a nearby bar. For a sense of model-specific ratings, the Bromic Platinum Smart-Heat Gas 500 produces 39,800 BTU and is rated to heat up to approximately 215 sq. ft. The Bromic Tungsten Smart-Heat Gas 500 is rated at 43,000 BTU and up to approximately 215 sq. ft. These are model ratings, not a guarantee of identical comfort in every patio.
Electric infrared heaters use radiant energy to warm people and objects directly, rather than first warming the surrounding air. This can suit an open patio where moving air makes heating the whole space less effective. Wall or ceiling mounting can preserve floor space and open sightlines around dining and cooking areas. Confirm circuit requirements, switching, and controls during planning, before finalizing finishes or ceiling details.
The Bromic Platinum Electric series offers multiple mounting options and a minimalist design for contemporary outdoor settings. In a louvered pergola, it can be recessed using the Low Clearance Recess Kit. This can integrate the heater with the overhead architecture while leaving room for lighting and other elements. Plan the recess, heater position, and required clearances together, following the manufacturer’s installation instructions.
Fuel choice also shapes how the system fits your routine. A natural-gas connection avoids propane tank exchanges, while propane lets a heater operate without a permanent gas line. Electric infrared models need suitable electrical service and a considered mounting position. Map connections and controls alongside the dining and kitchen zones instead of treating the heater as a late addition.
Compare the heater’s rated coverage with the area you actually want to warm. One unit may serve a single seating zone, while a larger patio may need separate heating zones. Bromic models show why it’s important to check the specific product: output and rated coverage vary. Use those figures to compare options, then account for the space’s openness and exposure when planning for comfort.
If you’re weighing fuel, output, and a recessed or mounted installation, discuss your heater layout as part of the broader outdoor-kitchen plan.
3. Choosing between mounted and freestanding gas patio heaters
Choose between a mounted and freestanding gas patio heater based on how you use the space. A fixed heater suits a dining area that stays in place, while a freestanding model can serve different seating arrangements. If you plan to extend outdoor living beyond one season, consider how each option affects circulation and the flexibility of the layout.
Start with the patio plan. Mark the grill, prep counters, dining table, and guest routes, then identify where people spend the most time. A mounted heater can keep floor space open near a bar or kitchen island. A freestanding unit can warm a separate lounge area and move when the patio is rearranged. Keep either option out of cooking paths and appliance access zones.
A pergola can make mounted heating part of the overhead design. Infrared heaters can be mounted in ceilings or pergolas, keeping equipment off the floor and sightlines open. If you’re planning a louvered roof, coordinate heater placement, mounting, and required clearances. Set these details before finalizing the pergola structure or ceiling finishes, and follow the specific heater’s instructions.
Recessing a heater in a pergola roof creates a cleaner architectural line, but the heater still needs its specified clearances. Decide where warmth is needed before choosing a recess or mounting location. A heater above dining seats serves that zone; one above a grill may direct warmth away from guests. Integrating heaters into outdoor kitchens means planning the cooking layout and social areas together.
Freestanding propane heaters offer a different kind of flexibility. The propane version of the Bromic Tungsten Smart-Heat Freestanding uses a standard 20-lb LPG tank. That tank-based arrangement can suit a patio without a permanent gas line, while the unit’s movable format supports changing seating plans. Position it to warm guests without narrowing paths between the kitchen, dining area, and other outdoor spaces.
Compare options against the environment and how the patio may change over time. A fixed dining table beneath a pergola may suit a mounted heater. A patio used for both dining and occasional gatherings may benefit from a freestanding unit that can be repositioned. For either approach, plan gas-line routing or tank access, mounting, and manufacturer clearances before finish work begins.
Use this sequence to find the right fit: identify the main gathering zone, decide whether its layout is permanent, then choose a fixed or movable position. Finally, coordinate fuel access and clearances with the pergola or kitchen design. These decisions help the heater support outdoor living without interrupting work areas or views.
4. Durability across climates and weather conditions
Let climate guide heater placement, materials, and care from the start. A patio exposed to coastal air, winter cold, or prevailing wind places different demands on equipment. Salt residue, for example, can build up on heater surfaces near the coast, so clean it rather than letting it accumulate. Regular care suited to the site helps keep the outdoor space ready to use through the season.
Wind affects how a heater performs. Bromic rates its Tungsten Gas series for wind conditions up to 8 mph. That rating is useful when comparing conditions, but wind exposure still matters at the actual installation site. A protected, properly ventilated location generally improves performance and reduces maintenance. Windbreaks can help shelter a dining zone, but they must not block ventilation or interfere with the heater’s required clearances.
Plan the surrounding layout for both shelter and airflow. A pergola or screen may reduce direct exposure, while the heater’s position determines whether warmth reaches the occupied area. Coordinate these elements rather than adding an enclosure after installation. Follow the model’s placement and use instructions, and account for local conditions when deciding where to put windbreaks.
Materials around the heater affect the look and upkeep of outdoor living spaces. Weather-resistant textiles can make dining more comfortable, while ambient lighting keeps a patio inviting after daylight fades. Choose fabrics and fixtures suited to the site’s exposure, and keep them clear of heat sources. For example, cushions at a protected table can soften the seating area without crowding the heater.
Cold-weather cooking calls for attention to kitchen appliances as well as the heater. Outdoor-kitchen insulation can help appliances use less gas or electricity to reach and maintain cooking temperatures. It can also help protect electronic components during winter. Insulation can help protect outdoor refrigerators and ice makers from heatwaves and freezing temperatures, supporting a more considered year-round kitchen plan.
Natural gas can suit a permanent installation where a gas line is part of the design. Coordinate its route and shutoff location with the heater and kitchen layout rather than leaving them until finishes are complete. In coastal spaces, include heater-surface cleaning in routine care; in windy settings, prioritize a sheltered, ventilated position. Choose a setup to suit the site instead of assuming one approach fits every climate.
Before finalizing the installation, review exposure at the intended seating area, planned wind protection, and maintenance needs for nearby surfaces. Then coordinate textiles and lighting with the heater’s position. A layout designed around local weather can support outdoor living through changing conditions while preserving clear circulation and kitchen workspace.
5. Freestanding heaters and design considerations
There’s no single BTU or watt figure for every outdoor kitchen. Propane patio heaters typically deliver 15,000 to 40,000 BTUs; choose based on the heater’s rated coverage and the area you want warm. Open layouts and wind exposure affect how much warmth reaches a gathering space.
A freestanding heater can warm lounge seating and move when the patio layout changes. Before positioning one, map the furniture, grill, dining area, and routes between them. Placing a heater beside a seating group, for example, can warm evening conversation without narrowing the path to kitchen appliances. Keep the unit clear of cooking and prep areas.
Consider the heater as part of the overall composition. A dark freestanding unit may recede against a pergola, while a sculptural flame feature can become a focal point. Coordinate its placement with furniture scale, landscape elements, and lighting. Leave enough open space for required clearances and access to the controls.
For a tower flame design, review the model’s stated fuel type, heat output, coverage, footprint, and clearance requirements before choosing a location. These details help determine whether it suits a dining zone, lounge area, or neither. Don’t choose by appearance alone; compare its stated heating capacity with the space and intended use.
Place freestanding heaters on a non-combustible surface, such as concrete, stone, or a heat-resistant mat. Coordinate the surface with nearby paving and furniture so the heater sits securely without interrupting circulation. If the plan includes a pergola, consider the heater and overhead structure together, following the heater’s required clearances.
Apply the same planning to other appliances. Keep the grill’s working area distinct from guest gathering spaces, both visually and practically. Position seating, for instance, so guests can enjoy the warmth without crowding the cook or blocking refrigerator access. This makes the heater part of the layout, not an obstacle added afterward.
Before finalizing a custom outdoor arrangement, consider three factors: the gathering area, the heater’s rated coverage, and the space required around the unit. Then coordinate the heater with furniture, landscaping, and lighting. A well-planned position can make an open patio more comfortable while preserving the kitchen’s clear lines and function.
There’s no single heat-output requirement for every outdoor kitchen. Propane patio heaters typically deliver 15,000 to 40,000 BTUs; choose one based on its rated coverage and the area you want to warm.
The Pinnacle Patio: Outdoor Kitchen Islands
The Pinnacle Patio offers Outdoor Kitchen Islands and Built-In Grills for homeowners planning a coordinated outdoor kitchen. As you shape heater placement, cooking zones, and dining areas, consider how the island and grill will fit the surrounding patio layout. Premium grill brands and high-end cooking equipment are also available options to suit your specific culinary needs.
Plan the kitchen alongside your heater decisions, including where guests gather and how clear paths connect seating with appliances. This helps you consider the whole arrangement before settling on a configuration when integrating heaters into outdoor kitchens. Explore Outdoor Kitchen Islands and grill options at thepinnaclepatio.com, or contact The Pinnacle Patio to discuss your outdoor kitchen plans.
Build the outdoor kitchen around how you gather
Before choosing finishes, decide what you want the space to make effortless: a relaxed meal, an evening with guests, or an easy transition between cooking and conversation. Each purpose may call for a different arrangement. Integrating heaters into outdoor kitchens works best when comfort supports the way you want to use the space.
Think of the heater as one part of a connected outdoor setting. Its position, controls, and relationship to the cooking area should feel intentional alongside the kitchen’s materials and overall design. The Pinnacle Patio offers Kokomo Grills to consider as you shape the cooking experience and coordinate it with the rest of the space.
A considered plan brings function and atmosphere together, creating an outdoor kitchen that feels natural to use and welcoming to gather around.
Start with how you want to spend time outdoors, then let the design follow.
Frequently Asked Questions
What types of heaters work best in outdoor kitchens?
Electric infrared and gas patio heaters are common options. The best fit depends on the kitchen’s utilities, layout, and gathering areas. With suitable electrical service, a mounted electric model can keep floor space open on a roofed patio. A gas heater may suit a different utility setup or placement plan. Compare each model’s coverage and mounting options with the space you want to use.
How do infrared, propane, natural gas, and electric patio heaters compare?
Infrared describes how heat is delivered; propane, natural gas, and electricity describe energy sources. Electric infrared heaters warm people and objects directly, while gas models use propane or natural gas. Natural-gas heaters avoid propane tank exchanges, while propane models can operate without a permanent gas line. Compare utility access, intended placement, and fuel management before choosing a heater.
Where should heaters be placed in an outdoor kitchen for effective coverage?
Position a heater to serve the area where people spend time, rather than directing it toward a wall or unused corner. Check its orientation against seating positions, since radiant heat works best when it reaches the people and objects you want to warm. In a split layout, assess each gathering area separately instead of expecting one position to serve every zone.
What clearances are required between outdoor heaters and ceilings, walls, appliances, or furniture?
Follow the clearances in the instructions for the exact heater and mounting configuration. Requirements vary by model and whether it’s mounted or freestanding, so don’t apply one heater’s spacing to another. Include nearby ceilings, walls, grills, furniture, and other surfaces in the layout review. Keep the required space unobstructed after installation, not just during construction.
What ventilation and safety measures are needed for gas heaters in covered outdoor kitchens?
Maintain the ventilation and clearances required by the heater’s manufacturer, and follow applicable local codes. A roof or pergola doesn’t make an outdoor space suitable for every gas-heater installation. Keep air paths open, avoid enclosing the heater, and plan gas-line routing and shutoff access before finishes are complete. Use the heater’s instructions to guide its use in the specific covered setting.
Can outdoor heaters be integrated with pergolas, roofs, or built-in kitchen structures?
Yes, heaters can be coordinated with pergolas and roof structures when the mounting method and required clearances are planned together. Decide on the heater position before finalizing roof details so mounting and utility routes work with the structure. In a built-in kitchen, keep the heater’s heat path separate from appliance access and cooking tasks. Follow the instructions for that heater and configuration.
How do wind, climate, and enclosure affect outdoor heater performance?
Wind can carry warmth away from a seating area, while a protected, properly ventilated location can support heater performance. A more enclosed layout changes exposure, but ventilation and required clearances still matter. In coastal settings, clean salt residue from heater surfaces rather than letting it build up. Assess actual site conditions, not just the patio’s overall design.
What are the fire, carbon monoxide, and weather-related risks of outdoor kitchen heaters?
Fire safety calls for clear space around heat sources, careful placement of paper goods, and supervision of children near fire features. With gas heaters, follow the model’s ventilation and use instructions, and don’t obstruct airflow in a covered area. Wind can affect heating, while coastal salt residue can build up on surfaces. Keep a fire extinguisher, water source, or sand bucket nearby for emergencies.